How to read a cross-stitch chart
How to read a counted cross-stitch chart: symbols, the thread key, grid lines, row and column numbers, center arrows and backstitch lines.
By The Hoop & Paw team · Published · 2 min read
A cross-stitch chart is a map of your fabric. Each square on the chart is one cross stitch on the fabric, and each symbol tells you which thread color to use.
The parts of a chart
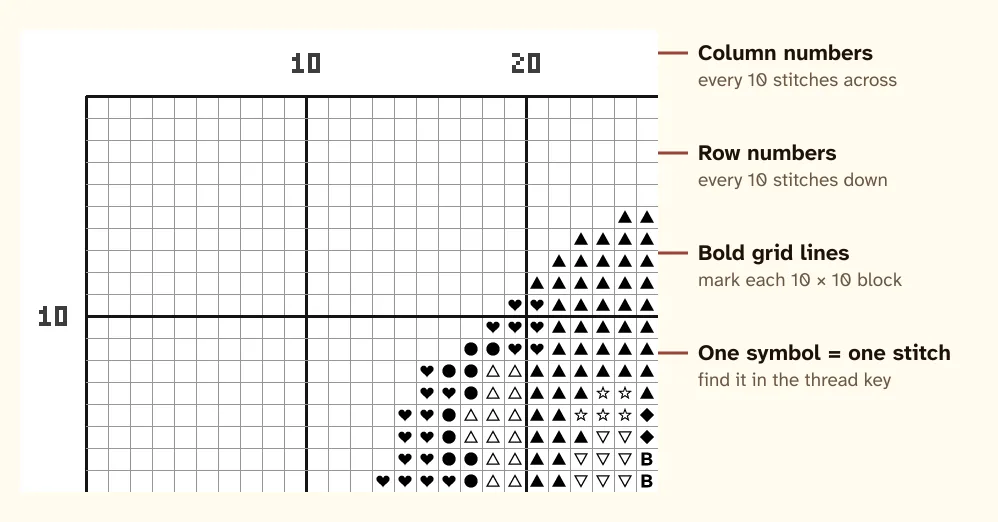
- Symbols: every color has its own symbol. Find the symbol in the thread key to see which DMC thread it is.
- Grid lines: thin lines separate stitches; bold lines every 10 stitches make it easy to count.
- Numbers: the columns and rows are numbered every 10 stitches, so you can always find your place.
- Center arrows: small arrows on the edges point to the middle row and column. Many stitchers start at the center so the design ends up centered on the fabric.
- Empty squares: no stitch — the fabric shows.
- Lines on top of the grid: backstitch, worked after the crosses with one strand.
Color or black and white?
Our printable patterns include both. The color chart shows each square in its thread color with the symbol on top — handy for seeing the picture. The black-and-white symbol chart is easier to read for long sessions and prints well on any printer.
Multi-page charts
Big patterns are split across several pages. Each page shows which rows and columns it covers, and pages overlap by a couple of rows so you can line them up. A page map at the end shows how the pages fit together.
Keeping your place
- Mark finished stitches with a highlighter on a printed copy (keep the original clean).
- Stitch in 10 × 10 blocks, using the bold lines.
- On a tablet, a chart-tracking app or a PDF annotation app lets you mark stitches as you go — see using PDF patterns on a tablet.