
How to turn a pet photo into a cross-stitch pattern
How a photo becomes a counted cross-stitch pattern: choosing the size, the number of colors and the crop — with side-by-side examples of what each setting changes.
By The Hoop & Paw team · Published · 2 min read
A cross-stitch pattern is a grid where every square is one stitch in one thread color. Turning a photo into a pattern means deciding three things: how many squares (the size), how many colors, and which part of the photo goes into the grid. Get those right and almost any clear photo of your pet will work.
1. Crop first
The pattern can only show what's in the frame. Crop so your pet's face and shoulders fill most of it — a full-body photo with lots of floor and sofa leaves only a few stitches for the eyes. In a 100-stitch pattern, an eye might be three stitches wide; crop closer and it gets five or six.
2. Choose the size
Size is the number of stitches across. It decides how much detail survives and how long the pattern takes:
| Width | Good for | Typical time |
|---|---|---|
| 50–60 stitches | Ornaments, cards, first projects | 15–30 hours |
| 80–100 stitches | A framed portrait with clear features | 40–90 hours |
| 120–150 stitches | Fur texture, fine markings | 100+ hours |
On 14-count Aida, divide by 14 for inches: 100 stitches = 7.1 inches. Our size calculator does it for every fabric.
3. Choose the number of colors
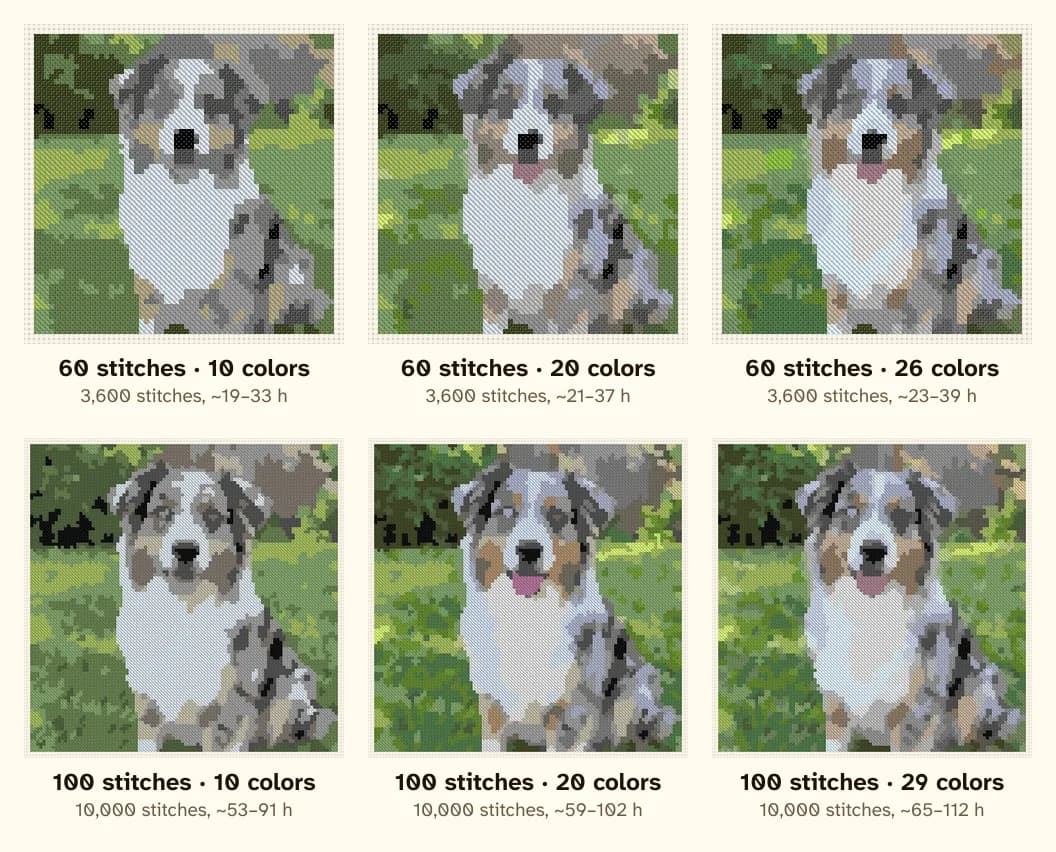
More colors give smoother shading, but each one is another thread to buy, start and finish. The grid above shows the same dog at 10, 20 and about 30 colors: the jump from 10 to 20 is big, the jump from 20 to 30 is small. For most pet portraits, 15 to 25 colors is the sweet spot.
Colors are always real DMC threads. Good software picks them from the photo itself rather than from a fixed palette, and keeps the few colors that matter most — the dark of an eye, the pink of a nose — even when they cover only a handful of stitches.
4. Clean up stray stitches
Straight conversion leaves lots of single stitches of a color surrounded by other colors ("confetti"). They're slow to stitch and look noisy. A clean-up pass merges most of them into their neighbors. See confetti stitches for the before and after.
5. Check it like a stitcher
Before you commit, look at the preview from across the room: does it look like your pet? Then look closely: are the eyes clear, is the nose a shape rather than a speckle, and is the background calm? If not, crop closer, add a few stitches or try fewer colors.
Our pattern maker does all of this in your browser, with a free preview that updates as you change the settings.