Stitching eyes and noses that bring a pet to life
Eyes and noses are what make a pet portrait recognizable. How to keep them clear in a pattern, which threads to use, and when to add backstitch.
By The Hoop & Paw team · Published · 2 min read
People recognize a pet by its eyes and nose before anything else. In a pattern they're also the smallest features — an eye might be just three or four stitches wide — so they need special care.
Keep them in the pattern
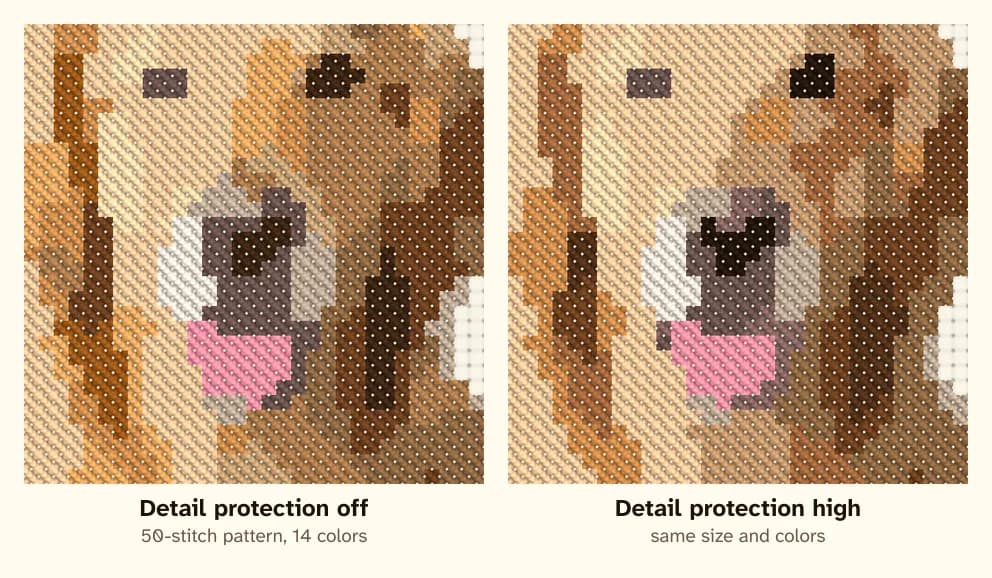
When a photo is reduced to a grid, tiny dark details can blur into the fur around them. Our pattern maker gives extra weight to eyes, noses and markings when it chooses colors (Detail protection in the Advanced settings), so the darkest pupil and the deepest nostril keep their own threads. Above, the same small pattern with protection off and high: the nostrils and eye come through much more clearly with it.
Size helps most
If the eyes look like smudges, crop closer or add stitches. Going from 60 to 90 stitches wide makes each eye 50% bigger — usually enough to show a highlight.
The catchlight
A single light stitch in each eye (the reflection of the window) is what makes eyes look alive. If your pattern doesn't have one, you can add it: one stitch of white or very light gray in the upper part of the pupil, the same side in both eyes.
Noses
- Dark noses: use the darkest thread for the nostrils and a slightly lighter one for the top of the nose, where it catches the light.
- Pink noses (many white cats and some dogs): a soft pink with a deeper pink for the nostrils.
Backstitch for definition
A single strand of dark backstitch around the eye rim or along the mouth line sharpens a small portrait. Keep it subtle — one strand, in a dark brown rather than black, often looks more natural. See backstitch for pet portraits.